

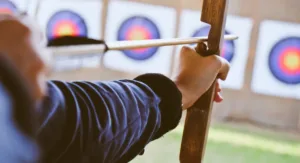
Archery is more than a sport; it’s an age-old tradition that combines focus, precision, and skill. With the rise in popularity of outdoor sports, archery has drawn enthusiasts and hobbyists alike to challenge themselves in more exciting and exciting ways.
Among the many tools available to archers, 3D archery targets stand out as a favorite for their ability to simulate real-life scenarios and improve accuracy. This guide will take you through everything you need to know about 3D archery targets, from their benefits to crafting your own. This will help you hit the mark every time.
Understanding 3d Archery Targets
What Are 3d Archery Targets?
3D archery targets are three-dimensional replicas of animals, providing archers with realistic practice environments. These targets mimic the size and shape of various game animals, helping archers hone their skills for hunting and competition. Made from durable materials like foam, they can withstand repeated shots, making them a staple in serious archery practice.
Benefits Of 3d Targets In Archery Practice
3D archery targets offer several advantages. Firstly, they enhance the realism of practice sessions by replicating animal anatomy, which improves shot placement during actual hunting scenarios. Secondly, these targets often come with scoring rings, allowing archers to track their progress and accuracy over time. Finally, engaging with 3D targets adds fun and challenge, making practice sessions more enjoyable and rewarding.
Types Of 3d Archery Targets On The Market
The market offers a variety of 3D archery targets to suit different needs and preferences. Some popular options include life-size deer, turkey, and bear targets, each designed for a unique challenge. Smaller targets, such as rabbits or squirrels, are also available for precision practice. With a range of brands and materials to choose from, finding the right target for your needs is easy.
Also Read : Master Your Aim With The Ultimate Guide To Archery Targets
How To Make Your Own 3d Archery Targets
Materials Needed
Creating your own 3D archery targets can be a highly rewarding and enjoyable project, allowing you to customize your targets to fit your preferences and needs. Here’s a detailed list of what you’ll need to get started:
- High-density foam blocks or sheets: These are crucial for absorbing arrow impact and preventing damage. Look for foam specifically designed for archery targets, as it provides better longevity and performance.
- Adhesives suitable for foam materials: Choose a strong adhesive that won’t degrade foam. Hot glue or specialized foam glue works well for bonding different sections together securely.
- Weather-resistant paint for detailing: To make your targets visually appealing and improve their visibility, opt for bright, weather-resistant paint. This will also protect the foam from the elements if you plan to use the targets outdoors.
- Protective coatings to enhance durability: Applying a sealant or protective coating can significantly extend the life of your targets by providing a barrier against moisture and UV damage.
Additionally, cost-effective alternatives can often be found at local hardware stores, craft stores, or online retailers, making DIY targets an affordable and practical option for archery enthusiasts. With a bit of creativity and effort, you can create targets that serve their purpose but also reflect your personal style!
Essential Tools Required
In addition to the materials required for your project, you’ll need to gather some essential tools to ensure a smooth and successful experience:
- A sharp utility knife or hot wire cutter is crucial for making precise cuts in your materials, ensuring clean edges and effective shaping.
- Paintbrushes for detailing will help you apply paint or finishes evenly, allowing for a polished final look that highlights your craftsmanship.
- A measuring tape for accuracy is vital; it ensures that your measurements are correct and that each piece fits together seamlessly, avoiding frustrating misalignments.
- Safety gear such as gloves and goggles is non-negotiable. Gloves protect your hands from sharp edges and potential irritants, while goggles shield your eyes from dust and debris during cutting and painting.
When working with tools, always adhere to safety guidelines by wearing protective gear and working in a well-ventilated area. This safeguards your well-being and enhances your working experience. Taking these precautions will help you focus on your project while minimizing risks.
Step By Step Guide To Making 3d Archery Targets
Step 1 – Preparing The Materials And Workspace
Begin by gathering all the necessary materials and tools. Arrange your workspace to ensure easy access to everything you need. Clear any clutter to avoid accidents, and set up a safe zone for cutting and assembling pieces.
Step 2 – Cutting And Shaping The Target
Using your chosen cutting tool, carefully shape the foam into the desired form. Start with broad cuts to outline the shape, and then make fine adjustments for detailed features. Patience and precision are key to a lifelike appearance.
Step 3 – Assembling The Pieces
Once your pieces are cut, use adhesive to assemble them into the final shape. Apply glue sparingly to avoid excess, and press the pieces together firmly. Allow ample drying time to ensure a strong bond.
Step 4 – Added Details And Painting
Once the basic shape has been completed, add realistic details using paint. Refer to images of the animal you’re replicating for color and pattern inspiration. Take your time with this step, as detailed painting enhances the target’s appearance and realism.
Step 6 – Final Touch And Testing Of The Target
After painting, apply a protective coating to seal and preserve your work. Once dry, set up your target in a safe outdoor area and conduct a few test shots to ensure stability and durability. Adjust as needed based on performance.
Expert Opinions And Tips
Professional Insights Into 3d Archery Practice
“3D archery targets provide an unparalleled training experience,” says archery coach John Doe.
“They teach archers to aim with precision and adapt to varied angles, mirroring real-world scenarios.”
Maintaining And Storing 3d Archery Targets
To prolong your targets’ life, store them in a cool, dry place when not in use. Regularly inspect for wear and tear, applying touch-ups or repairs as needed. Proper maintenance ensures continued performance and enjoyment.
Avoiding Common Mistakes With 3d Targets
Avoid placing targets too close to hard surfaces, as errant arrows may cause damage. Additionally, ensure your targets are secured to prevent tipping during use. Awareness of these factors contributes to a safe and fulfilling archery experience.
Resources And Further Reading
For additional information, explore these resources:
- Healthline’s insights into archery’s physical and mental health benefits (link)
- Archery360’s comprehensive guide to 3D archery (link)
- The American Archery Association’s top practice tips (link)
Enhance your knowledge further with books like “The Complete Guide to Archery” by Dave Morris and “Archery Fundamentals” by Teresa Johnson.
Conclusion
3D archery targets offer an exciting way to improve your archery skills. Whether you purchase them or make your own, these targets provide invaluable practice opportunities, helping you become a more accurate and confident archer. We hope this guide inspires you to explore 3D archery.
Ready to set your own goals? Share your projects and insights with fellow enthusiasts on our community forum. Your experience could inspire someone else to improve their goals.
Frequently Asked Questions
What Are The Benefits Of 3d Archery Targets Over Traditional Flat Targets?
3D archery targets provide a more realistic shooting experience, helping archers practice shot placement in scenarios similar to real hunting situations. They also make practice more engaging and fun.
Can I Use Any Type Of Foam To Create My Own 3d Archery Targets?
While high-density foam is recommended for durability and longevity, other types of foam can also be used. However, they may not withstand repeated shots as effectively.
How Do I Care For And Maintain My 3d Archery Targets?
To ensure their longevity, store your targets in a cool and dry place, regularly check for signs of wear, and perform touch-ups or repairs as necessary to keep them in pristine condition.
What Is The Most Effective Way To Secure My 3d Archery Target During Practice?
It’s important to place your targets on a stable surface and avoid placing them too close to rough objects. Using stakes or weights can help ensure they remain upright and secure during use.
How Can I Improve My 3d Target Accuracy?
Regular practice is essential. Focus on shot placement, vary your shooting positions and angles, and consider practicing with friends to gain different perspectives and tips on improving accuracy.
Are There Any Specific Tools Essential For Making 3d Archery Targets?
Key tools include a sharp utility knife or hot wire cutter for shaping foam, paintbrushes for detailing, and a measuring tape for accuracy. Safety gear such as gloves and goggles is also highly recommended.
Recommended Articles
- Archery Release Types – A Comprehensive Guide

- Powerful Backyard Archery Range: Beginner’s Ultimate Guide
- Peep Sight On A Compound Bow : A Comprehensive Guide For Beginners
- Best Crossbow Broadhead: Perfect Arrowhead for Precision and Power
- Axe 405 Crossbow Problems: Overcoming Common Problems
- Exploring the Empowerment of Hunting with Recurve Bow


2 thoughts on “Aim True With 3d Archery Targets And Hit The Mark Every Time”
Comments are closed.