Master the Art of Archery: 6 Steps to Draw a Bow and Shoot with Precision

How to draw a bow 6 steps which make you professional archer

Take a moment to imagine yourself standing at the edge of a lush green forest with your eyes locked on a distant target. Taking a deep breath, you feel the bow’s weight in your hand as anticipation grows. You pull back the string with focused determination and release it gracefully. With effortless precision, the arrow soars across the sky, hitting its target dead center. Isn’t that something you’d see in an action film? Here’s how we describe the 6 Steps to draw a bow and shoot with unprecedented accuracy – it doesn’t have to be fiction. We are embarking on an exciting journey together, so get ready to unleash your inner archer!

You need to select the right bow and arrows for archery to be successful and have an enjoyable time. Whatever your skill level, choosing the right archery equipment is crucial, whether you’re a beginner or an experienced archer.

Select the Right Bow

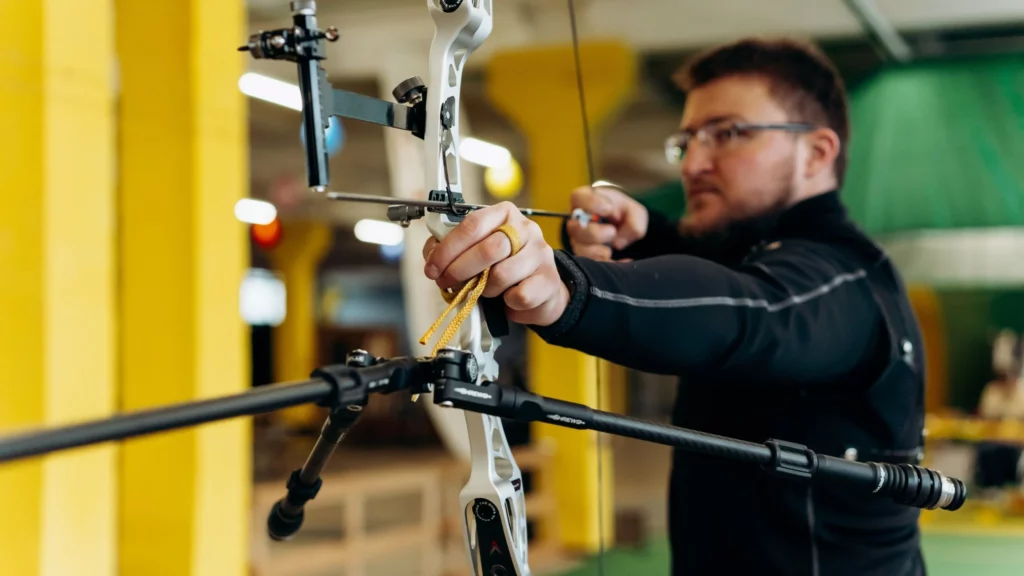
It is vital to understand the different types of bows available. Various bows, including recurve bows, compound bows, longbows, and more are available. In terms of advantages and characteristics, each type is unique.

Due to its simplicity and versatility, recurve bows for beginners are often recommended. In addition to being easy to handle, it allows for a gradual progression in skill development. In contrast, compound bows are more advanced and offer features such as adjustable draw weight and let-off.

select the right bow and arrows is first step to draw a bow

Choosing the Arrows

The next step is to select the right kind of arrows to go with your bow. Arrows can be made of wood, aluminum, carbon fiber, or a combination of these materials. While selecting an arrow, it is important to consider factors like arrow length, spine stiffness (related to draw weight), and tip weight.

You should consult with knowledgeable professionals at an archery shop to guide you through this process. Your specific needs and goals will determine this.

Additional archery equipment

Along with choosing the right bow and arrows, other equipment will enhance your archery experience. For example, finger tabs or gloves can protect your fingers while drawing back the string, arm guards to prevent injury from string slapping against your forearm, sights to improve accuracy, and stabilizers to keep your balance.

With a bit of thought given to each step of choosing your bow and arrows and expert advice when necessary, you will be set up for success in archery and enjoy this ancient sport to the fullest

Step 2: Understanding Proper Stance and Posture for Better Aim to draw a bow

A good stance and posture are essential to achieving accuracy and consistency in archery. No matter your experience or skill level, understanding the correct body alignment is crucial for a better aim.

Your archery stance should be the first thing you consider. It is important to maintain balance and stability by keeping your feet shoulder-width apart. This way, your weight is distributed evenly, and you maintain a solid foundation throughout the shot.

Next, pay attention to your posture in the upper body. Ensure your back is straight, your shoulders are relaxed, and your chin is level with the ground. You should avoid slouching or leaning forward, as this can negatively impact your aim and cause muscle strain.

to draw a bow professionally it is important to understand proper stance and posture

For consistent shooting, arm alignment is also crucial. Keep your elbow bent while extending your bow arm straight toward the target. You should open your drawing arm fully behind you, creating a straight line from your bow hand to your anchor point on your face.

Throughout each shot, engage your core muscles to maintain your posture. In addition to maintaining stability, a strong core transfers energy efficiently from the body to the bowstring.

Practicing and refining these critical elements of stance and posture in archery is essential to develop a solid foundation for better aim. By following these fundamentals consistently, archers will improve their accuracy and overall performance

Step 3: Nocking the Arrow - How to Position the Arrow on the Bowstring

Correctly picking and positioning an arrow on the bowstring directly impacts accuracy and consistency in archery. No matter what archer level you are, understanding the correct technique for arrow placement is essential to a successful release.

The first step is to set up your bow correctly and align your arrow rest. As a result, your shots will be stable. The next step is to locate the nock, the groove at the back end of the arrow. The nock secures the arrow to the bowstring.

As you extend your bow towards your target, hold it in your non-dominant hand. Place two fingers above and one finger below the nock of the arrow with your dominant hand. Slide the nock onto the bowstring until it locks.

To draw a bow you also nock the arrow for take proper shoot

It’s important to remember that the alignment of the arrows on the bowstring depends on personal preference and shooting style. Generally, however, you should position the cock feather (the odd-colored feather) away from you and towards the outside.

Once you have positioned the arrow on the bowstring, gently tug on the string to ensure its stability. Ideally, it should fit snugly but still allow smooth movement

Step 4: Drawing the Bow - Techniques for Achieving Optimal Power and Control

In order to achieve optimal power and control, archers must master the art of drawing a bow. During this crucial step, called “Drawing the Bow,” proper technique and tension are essential.

Archers must have a solid stance and posture foundation before achieving optimal power. Keeping your feet shoulder-width apart and your weight evenly distributed is crucial to maintaining a balanced and relaxed posture.

A firm grip on the bow handle is essential when drawing the bow. The fingers should be wrapped around the handle firmly but not excessively tight, allowing flexibility and control.

Make sure your draw hand remains tight as you draw the bowstring back. In this step, you’ll smooth back your wrist while keeping it aligned with your forearm. Avoid twisting or bending your wrists to avoid inconsistencies in your shots.

During this step, archers should also pay attention to their shoulder alignment. It is crucial to keep both shoulders level throughout the drawing process, ensuring balanced muscle engagement and minimizing strain.

Consistently practicing these techniques will improve an archer’s ability to draw smoothly and controllably while maintaining accuracy. In order to achieve optimal results when drawing a bow, proper form and technique are vital

Step 5: Aiming and Focusing - Tips to Enhance Accuracy and Precision

You must aim and focus properly in archery, significantly impacting accuracy and precision. Mastering these techniques is essential no matter how experienced you are as an archer. Our objective in this section is to provide valuable tips to help you improve your skills in aiming and focusing.

Proper sight alignment is one of the key aspects of archery aiming. It involves aligning your bow’s sight pin with the target. To do this effectively, ensure that the sight pin is centered within the housing of the peep sight or scope. Also, ensure that the bubble level on your bow is centered to maintain balance and stability.

Maintaining a steady grip on the bow during aiming is another key to improving accuracy. Keep your aim on target by avoiding unnecessary movements or jerks. Keep your grip relaxed while maintaining tension in your fingers to ensure consistent release.

For accurate shots, it is equally important to focus on the target. Instead of focusing on your bow or arrow, concentrate on the point at which your arrow is most likely to strike the target. In this way, physical and mental focus can be aligned towards precision.

It is also possible to improve precision and accuracy through visualization techniques. Think about hitting the target with the correct form and execution before you take a shot. As a result of this mental preparation, your mind is trained to focus on the desired outcome.

Last, focusing and aiming consistently over time can significantly improve results. Establishing a step-by-step process that includes aligning sights, adjusting body position, and mentally focusing on the target before each shot ensures success.

By incorporating these tips into your practice sessions regularly, you will gradually improve your ability to aim accurately and maintain focus. To master archery skills, you must be consistent and patient

Step 6: Release the Arrow - Execute a Smooth Release for Consistent Shots

Achieving consistent and accurate shots in archery requires proper technique and a smooth, controlled release. Throughout our archery guide, step 6 discusses the importance of a seamless release for consistent shots.

Regardless of your level of archery, mastering bow and arrow release is essential. The energy in the bowstring must be transferred properly to the arrow release form to launch the arrow effectively toward its target. As a result, unnecessary movement or torque is minimized, negatively impacting accuracy.

Keeping your grip on the bow handle steady can be achieved by focusing on a smooth release. You will then be able to release the string with your fingers effortlessly. As a result, you are more likely to hit your intended target consistently, thanks to a clean and consistent flight path.

Release the arrows is last step for draw a bow

Finding a comfortable anchor point, maintaining proper hand placement, and controlling your fingers to execute a smooth release are important. Release your arrow without jerking or plucking, as this can introduce unwanted variables into your shot.

Increasing shooting confidence and accuracy will be possible using a consistent release technique. The form of your arrow release can be refined with practice and attention to detail to provide reliable results time after time.

Our next section will discuss additional tips and drills that will improve your archery skills. Follow along as we continue our journey towards archery proficiency!

Bonus tips:

  1. Make sure your bow and arrows are tuned correctly.
  2. Practice regularly to maintain consistency in your shooting form.
  3. Joining an archery club or seeking guidance from experienced archers.
  4. Handling bows and arrows safely.
  5. Identifying the different types of archery competitions and events.

Conclusion: Become a Skilled Archer by Mastering the Art of Draw a Bow and Shooting with Precision

Developing your ability to draw a bow and shoot with precision can transform you into a skilled archer. You can achieve remarkable accuracy in archery by honing your technique and practicing consistently.

It takes strength, control, and proper form to draw a bow. Developing the right muscles to maintain a steady grip on the bowstring is crucial. You can improve your ability to draw smoothly and efficiently by practicing.

The process of shooting precision involves focusing, aiming, and releasing. It is possible to consistently hit your mark accurately by aligning your body, fixing your gaze on the target, and carefully removing the bowstring.

There is more to archery than physical prowess. As well as physical discipline, mental discipline is required. Consistent performance requires maintaining focus under pressure. When faced with challenging situations or competitions, you can train yourself to remain calm and composed with patience and determination.

To conclude, learning to draw a bow and shoot with precision is an ongoing journey that takes commitment and perseverance. You can become an accomplished archer capable of hitting targets with unwavering accuracy by constantly refining your technique and sharpening your mental focus. Grab your bow, embrace the challenges ahead, and embark on this rewarding path

3 thoughts on “Master the Art of Archery: 6 Steps to Draw a Bow and Shoot with Precision”

Comments are closed.